Capsule Development
Prerequisites
Make sure you have these tools installed:
- Go 1.19+
- Operator SDK 1.7.2+, or Kubebuilder
- KinD or k3d, with
kubectl - ngrok (if you want to run locally with remote Kubernetes)
- golangci-lint
- OpenSSL
Setup a Kubernetes Cluster
A lightweight Kubernetes within your laptop can be very handy for Kubernetes-native development like Capsule.
By k3d
# Install K3d cli by brew in Mac, or your preferred way
$ brew install k3d

# Export your laptop's IP, e.g. retrieving it by: ifconfig
# Do change this IP to yours
$ export LAPTOP_HOST_IP=192.168.10.101

# Spin up a bare minimum cluster
# Refer to here for more options: https://k3d.io/v4.4.8/usage/commands/k3d_cluster_create/
$ k3d cluster create k3s-capsule --servers 1 --agents 1 --no-lb --k3s-server-arg --tls-san=${LAPTOP_HOST_IP}

# Get Kubeconfig
$ k3d kubeconfig get k3s-capsule > /tmp/k3s-capsule && export KUBECONFIG="/tmp/k3s-capsule"

# This will create a cluster with 1 server and 1 worker node
$ kubectl get nodes
NAME                       STATUS   ROLES                  AGE     VERSION
k3d-k3s-capsule-server-0   Ready    control-plane,master   2m13s   v1.21.2+k3s1
k3d-k3s-capsule-agent-0    Ready    <none>                 2m3s    v1.21.2+k3s1

# Or 2 Docker containers if you view it from Docker perspective
$ docker ps
CONTAINER ID   IMAGE                      COMMAND                  CREATED          STATUS          PORTS                     NAMES
5c26ad840c62   rancher/k3s:v1.21.2-k3s1   "/bin/k3s agent"         53 seconds ago   Up 45 seconds                             k3d-k3s-capsule-agent-0
753998879b28   rancher/k3s:v1.21.2-k3s1   "/bin/k3s server --t…"   53 seconds ago   Up 51 seconds   0.0.0.0:49708->6443/tcp   k3d-k3s-capsule-server-0
By kind
# # Install kind cli by brew in Mac, or your preferred way
$ brew install kind

# Prepare a kind config file with necessary customization
$ cat > kind.yaml <<EOF
kind: Cluster
apiVersion: kind.x-k8s.io/v1alpha4
networking:
  apiServerAddress: "0.0.0.0"
nodes:
- role: control-plane
  kubeadmConfigPatches:
  - |
    kind: ClusterConfiguration
    metadata:
      name: config
    apiServer:
      certSANs:
      - localhost
      - 127.0.0.1
      - kubernetes
      - kubernetes.default.svc
      - kubernetes.default.svc.cluster.local
      - kind
      - 0.0.0.0
      - ${LAPTOP_HOST_IP}
- role: worker
EOF

# Spin up a bare minimum cluster with 1 master 1 worker node
$ kind create cluster --name kind-capsule --config kind.yaml

# This will create a cluster with 1 server and 1 worker node
$ kubectl get nodes
NAME                         STATUS   ROLES                  AGE   VERSION
kind-capsule-control-plane   Ready    control-plane,master   84s   v1.21.1
kind-capsule-worker          Ready    <none>                 56s   v1.21.1

# Or 2 Docker containers if you view it from Docker perspective
$ docker ps
CONTAINER ID   IMAGE                  COMMAND                  CREATED              STATUS              PORTS                     NAMES
7b329fd3a838   kindest/node:v1.21.1   "/usr/local/bin/entr…"   About a minute ago   Up About a minute   0.0.0.0:54894->6443/tcp   kind-capsule-control-plane
7d50f1633555   kindest/node:v1.21.1   "/usr/local/bin/entr…"   About a minute ago   Up About a minute                             kind-capsule-worker
Fork, build, and deploy Capsule
The fork-clone-contribute-pr flow is common for contributing to OSS projects like Kubernetes and Capsule.
Let's assume you've forked it into your GitHub namespace, say myuser, and then you can clone it with Git protocol.
Do remember to change the myuser to yours.
$ git clone git@github.com:myuser/capsule.git && cd capsuleIt's a good practice to add the upstream as the remote too so we can easily fetch and merge the upstream to our fork:
$ git remote add upstream https://github.com/projectcapsule/capsule.git
$ git remote -vv
origin	git@github.com:myuser/capsule.git (fetch)
origin	git@github.com:myuser/capsule.git (push)
upstream	https://github.com/projectcapsule/capsule.git (fetch)
upstream	https://github.com/projectcapsule/capsule.git (push)
Pull all tags
$ git fetch --all && git pull upstreamBuild and deploy:
# Download the project dependencies
$ go mod download

# Build the Capsule image
$ make docker-build

# Retrieve the built image version
$ export CAPSULE_IMAGE_VESION=`docker images --format '{{.Tag}}' clastix/capsule`

# If k3s, load the image into cluster by
$ k3d image import --cluster k3s-capsule capsule clastix/capsule:${CAPSULE_IMAGE_VESION}
# If Kind, load the image into cluster by
$ kind load docker-image --name kind-capsule clastix/capsule:${CAPSULE_IMAGE_VESION}

# deploy all the required manifests
# Note: 1) please retry if you saw errors; 2) if you want to clean it up first, run: make remove
$ make deploy

# Make sure the controller is running
$ kubectl get pod -n capsule-system
NAME                                          READY   STATUS    RESTARTS   AGE
capsule-controller-manager-5c6b8445cf-566dc   1/1     Running   0          23s

# Check the logs if needed
$ kubectl -n capsule-system logs --all-containers -l control-plane=controller-manager

# You may have a try to deploy a Tenant too to make sure it works end to end
$ kubectl apply -f - <<EOF
apiVersion: capsule.clastix.io/v1beta2
kind: Tenant
metadata:
  name: oil
spec:
  owners:
  - name: alice
    kind: User
  - name: system:serviceaccount:capsule-system:default
    kind: ServiceAccount
EOF

# There shouldn't be any errors and you should see the newly created tenant
$ kubectl get tenants
NAME   STATE    NAMESPACE QUOTA   NAMESPACE COUNT   NODE SELECTOR   AGE
oil    Active                     0                                 14s
If you want to test namespace creation or such stuff, make sure to use impersonation:
$ kubectl ... --as system:serviceaccount:capsule-system:default --as-group capsule.clastix.ioAs of now, a complete Capsule environment has been set up in kind- or k3d-powered cluster, and the capsule-controller-manager is running as a deployment serving as:
- The reconcilers for CRDs and;
- A series of webhooks
Setup the development environment
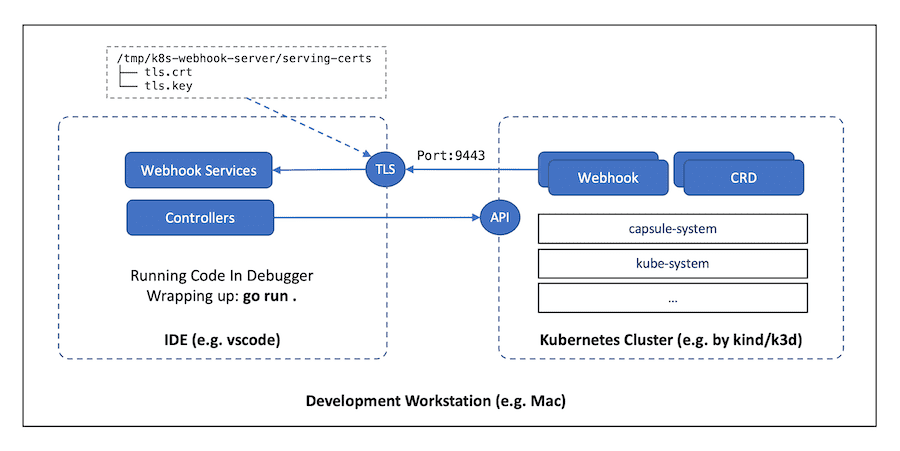
During development, we prefer that the code is running within our IDE locally, instead of running as the normal Pod(s) within the Kubernetes cluster.
Such a setup can be illustrated as below diagram:
To achieve that, there are some necessary steps we need to walk through, which have been made as a make target within our Makefile.
So the TL;DR answer is:
# If you haven't installed or run `make deploy` before, do it first
# Note: please retry if you saw errors
$ make deploy

# To retrieve your laptop's IP and execute `make dev-setup` to setup dev env
# For example: LAPTOP_HOST_IP=192.168.10.101 make dev-setup
$ LAPTOP_HOST_IP="<YOUR_LAPTOP_IP>" make dev-setup
This is a very common setup for typical Kubernetes Operator development so we'd better walk them through with more details here.
- Scaling down the deployed Pod(s) to 0
We need to scale the existing replicas of capsule-controller-manager to 0 to avoid reconciliation competition between the Pod(s) and the code running outside of the cluster, in our preferred IDE for example.
$ kubectl -n capsule-system scale deployment capsule-controller-manager --replicas=0
deployment.apps/capsule-controller-manager scaled- Preparing TLS certificate for the webhooks
Running webhooks requires TLS, we can prepare the TLS key pair in our development env to handle HTTPS requests.
# Prepare a simple OpenSSL config file
# Do remember to export LAPTOP_HOST_IP before running this command
$ cat > _tls.cnf <<EOF
[ req ]
default_bits       = 4096
distinguished_name = req_distinguished_name
req_extensions     = req_ext
[ req_distinguished_name ]
countryName                = SG
stateOrProvinceName        = SG
localityName               = SG
organizationName           = CAPSULE
commonName                 = CAPSULE
[ req_ext ]
subjectAltName = @alt_names
[alt_names]
IP.1   = ${LAPTOP_HOST_IP}
EOF

# Create this dir to mimic the Pod mount point
$ mkdir -p /tmp/k8s-webhook-server/serving-certs

# Generate the TLS cert/key under /tmp/k8s-webhook-server/serving-certs
$ openssl req -newkey rsa:4096 -days 3650 -nodes -x509 \
  -subj "/C=SG/ST=SG/L=SG/O=CAPSULE/CN=CAPSULE" \
  -extensions req_ext \
  -config _tls.cnf \
  -keyout /tmp/k8s-webhook-server/serving-certs/tls.key \
  -out /tmp/k8s-webhook-server/serving-certs/tls.crt

# Clean it up
$ rm -f _tls.cnf- Patching the Webhooks
By default, the webhooks will be registered with the services, which will route to the Pods, inside the cluster.
We need to delegate the controllers' and webhooks' services to the code running in our IDE by patching the MutatingWebhookConfiguration and ValidatingWebhookConfiguration.
# Export your laptop's IP with the 9443 port exposed by controllers/webhooks' services
$ export WEBHOOK_URL="https://${LAPTOP_HOST_IP}:9443"

# Export the cert we just generated as the CA bundle for webhook TLS
$ export CA_BUNDLE=`openssl base64 -in /tmp/k8s-webhook-server/serving-certs/tls.crt | tr -d '\n'`

# Patch the MutatingWebhookConfiguration webhook
$ kubectl patch MutatingWebhookConfiguration capsule-mutating-webhook-configuration \
    --type='json' -p="[\
      {'op': 'replace', 'path': '/webhooks/0/clientConfig', 'value':{'url':\"${WEBHOOK_URL}/mutate-v1-namespace-owner-reference\",'caBundle':\"${CA_BUNDLE}\"}}\
    ]"

# Verify it if you want
$ kubectl get MutatingWebhookConfiguration capsule-mutating-webhook-configuration -o yaml

# Patch the ValidatingWebhookConfiguration webhooks
# Note: there is a list of validating webhook endpoints, not just one
$ kubectl patch ValidatingWebhookConfiguration capsule-validating-webhook-configuration \
    --type='json' -p="[\
       {'op': 'replace', 'path': '/webhooks/0/clientConfig', 'value':{'url':\"${WEBHOOK_URL}/cordoning\",'caBundle':\"${CA_BUNDLE}\"}},\
       {'op': 'replace', 'path': '/webhooks/1/clientConfig', 'value':{'url':\"${WEBHOOK_URL}/ingresses\",'caBundle':\"${CA_BUNDLE}\"}},\
       {'op': 'replace', 'path': '/webhooks/2/clientConfig', 'value':{'url':\"${WEBHOOK_URL}/namespaces\",'caBundle':\"${CA_BUNDLE}\"}},\
       {'op': 'replace', 'path': '/webhooks/3/clientConfig', 'value':{'url':\"${WEBHOOK_URL}/networkpolicies\",'caBundle':\"${CA_BUNDLE}\"}},\
       {'op': 'replace', 'path': '/webhooks/4/clientConfig', 'value':{'url':\"${WEBHOOK_URL}/pods\",'caBundle':\"${CA_BUNDLE}\"}},\
       {'op': 'replace', 'path': '/webhooks/5/clientConfig', 'value':{'url':\"${WEBHOOK_URL}/persistentvolumeclaims\",'caBundle':\"${CA_BUNDLE}\"}},\
       {'op': 'replace', 'path': '/webhooks/6/clientConfig', 'value':{'url':\"${WEBHOOK_URL}/services\",'caBundle':\"${CA_BUNDLE}\"}},\
       {'op': 'replace', 'path': '/webhooks/7/clientConfig', 'value':{'url':\"${WEBHOOK_URL}/tenants\",'caBundle':\"${CA_BUNDLE}\"}},\
       {'op': 'replace', 'path': '/webhooks/8/clientConfig', 'value':{'url':\"${WEBHOOK_URL}/nodes\",'caBundle':\"${CA_BUNDLE}\"}}\
    ]"

# Verify it if you want
$ kubectl get ValidatingWebhookConfiguration capsule-validating-webhook-configuration -o yaml
Run Capsule outside the cluster
Now we can run Capsule controllers with webhooks outside of the Kubernetes cluster:
$ export NAMESPACE=capsule-system && export TMPDIR=/tmp/
$ go run .
To verify that, we can open a new console and create a new Tenant:
$ kubectl apply -f - <<EOF
apiVersion: capsule.clastix.io/v1beta2
kind: Tenant
metadata:
  name: gas
spec:
  owners:
  - name: alice
    kind: User
EOF
We should see output and logs in the make run console.
Now it's time to work through our familiar inner loop for development in our preferred IDE. For example, if you're using Visual Studio Code, this launch.json file can be a good start.
{
    "version": "0.2.0",
    "configurations": [
        {
            "name": "Launch",
            "type": "go",
            "request": "launch",
            "mode": "auto",
            "program": "${workspaceFolder}",
            "args": [
                "--zap-encoder=console",
                "--zap-log-level=debug",
                "--configuration-name=capsule-default"
            ],
            "env": {
                "NAMESPACE": "capsule-system",
                "TMPDIR": "/tmp/"
            }
        }
    ]
}